How to Clean a Lawn Mower Carburetor: Step-by-Step Guide for 2026
TL;DR
- A dirty carburetor is the most common reason a lawn mower starts rough, stalls under load, or won’t idle steadily.
- This guide covers two methods: a quick spray-clean without removing the carburetor, and a full removal and soak for stubborn buildup.
- You need carburetor cleaner spray, a screwdriver set, needle-nose pliers, and about 30-60 minutes depending on which method you use.
- Most carburetor problems come from old fuel left sitting over winter – ethanol in pump gas breaks down and leaves a sticky varnish that clogs the jets.
- Both methods work on the vast majority of walk-behind push mowers and self-propelled mowers with single-cylinder engines.
What a Lawn Mower Carburetor Does and Why It Gets Dirty
Credit: https://www.bobvila.com/
The carburetor mixes air and fuel in the right ratio before sending that mixture into the engine. When it’s clean and working correctly, your mower starts on the first or second pull and runs at a steady throttle.
The most common cause of carburetor buildup is stale fuel. Gasoline with ethanol (which is most pump gas sold in the US) starts to degrade in as little as 30 days (Briggs & Stratton, 2023). Leave fuel in the tank over winter without a stabilizer, and by spring that gas has turned into a gummy residue that partially or fully blocks the small passages inside the carburetor.
The result: hard starting, rough idling, stalling when you engage the blade, or the engine running briefly then cutting out.
Signs Your Carburetor Needs Cleaning
Your carburetor is likely the problem if you’re seeing any of these:
- The mower starts but dies within 30 seconds of running.
- The engine surges – revving up and down on its own instead of holding a steady speed.
- The mower runs fine at full throttle but stalls at low throttle or idle.
- You can see black smoke or smell a strong fuel odor from the exhaust.
- The mower sat unused for more than 60 days with fuel in the tank.
If your mower won’t start at all, also check the spark plug first. A fouled plug is a faster fix than a carburetor clean, and the symptoms overlap.
Which Method Should You Use?
| Method | Best For | Time | Skill Level |
|---|---|---|---|
| Spray-clean (no removal) | Mild buildup, mower ran last season | 15-20 minutes | Beginner |
| Full removal and soak | Heavy varnish, mower sat 6+ months | 45-60 minutes | Beginner to intermediate |
Start with the spray method. If the mower still runs poorly after that, move to the full removal.
What You Need Before You Start
Tools:
- Flathead and Phillips screwdriver
- Needle-nose pliers
- Adjustable wrench or socket set (3/8-inch drive works for most mowers)
- Small bowl or parts tray to hold screws
Supplies:
- Carburetor cleaner spray (WD-40 Specialist Carb & Throttle Body Cleaner or Gumout Carb & Choke Cleaner are widely available)
- A small container of clean gasoline or carburetor dip cleaner (for the full removal method)
- Clean rags or paper towels
- Safety glasses
Safety steps before you touch anything:
- Let the engine cool completely – at least 15 minutes after the last run.
- Disconnect the spark plug wire and tuck it away from the plug so the engine cannot start.
- Work in a well-ventilated area away from open flames. Carburetor cleaner is flammable.
Method 1: Spray-Clean Without Removing the Carburetor
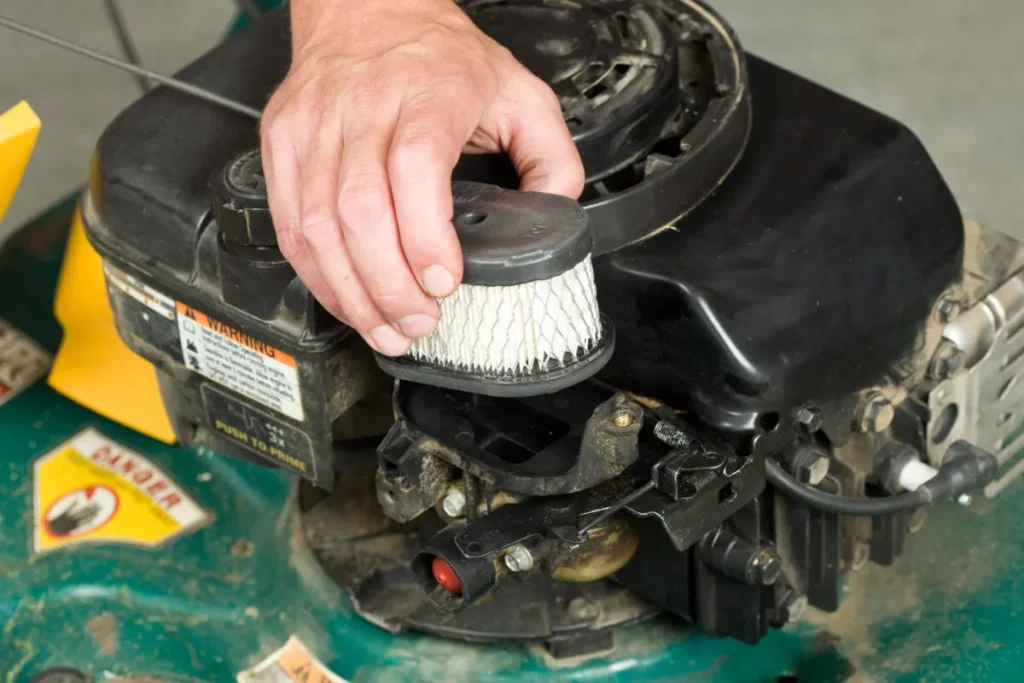
Step 1: Locate and Remove the Air Filter
The carburetor sits directly behind the air filter on almost every walk-behind mower. Remove the air filter cover – usually one screw or a quarter-turn plastic knob – and pull out the filter. Set it aside.
You’ll now see the carburetor’s air intake throat, which is the round opening the filter was covering.
Step 2: Spray Cleaner Into the Carburetor Throat
Hold the spray cleaner straw about two inches from the opening. Give it three to four short bursts directly into the throat.
Don’t soak it – short bursts work better than one long spray. The cleaner needs a moment to dissolve varnish rather than just washing over it.
Step 3: Work the Choke and Throttle Linkage
Locate the choke plate inside the throat – it’s a small metal flap. Use your finger or a small screwdriver to open and close it several times while spraying. This works the cleaner into the edges of the plate and the surrounding bore.
Do the same with the throttle linkage on the outside of the carburetor body. Move it through its full range while you spray the pivot points.
Step 4: Let It Sit, Then Start the Mower
Wait five minutes for the cleaner to penetrate. Reconnect the spark plug wire, then start the mower and let it run at full throttle for two to three minutes.
The engine may smoke slightly at first as the cleaner burns off. That’s normal. If it clears up and the mower runs smoothly, you’re done. If the rough running continues, move to Method 2.
Method 2: Full Carburetor Removal and Cleaning

Credit: https://www.slashgear.com/
Step 1: Drain the Fuel Tank
Tip the mower forward onto its front wheels and drain the fuel into a clean container using a turkey baster or siphon pump. You can also run the engine until it dies from fuel starvation.
You want the tank empty before disconnecting the fuel line. Less mess, less risk.
Step 2: Disconnect the Fuel Line and Throttle Linkage
Clamp or pinch the fuel line with pliers to stop any remaining drips, then slide the hose clamp back with needle-nose pliers and pull the fuel line off the carburetor inlet. Have a rag ready.
Take a photo of the throttle and choke linkage before disconnecting anything. These small spring-loaded arms can be confusing to reassemble if you don’t have a reference. Disconnect the linkage rods by unclipping them from the carburetor body.
Step 3: Remove the Carburetor from the Engine
Most carburetors on common walk-behind mowers are held on by two bolts – typically 10mm. Remove them, then carefully pull the carburetor straight off the intake. There’s a gasket between the carb and the engine; try not to tear it.
Step 4: Disassemble the Carburetor Bowl
Flip the carburetor over. On the bottom you’ll see the float bowl – a small rounded cup held on by a single bolt in the center. Remove that bolt and pull the bowl off.
Inside the bowl you’ll likely see a brownish or yellowish residue. That’s the varnish from degraded fuel.
At the center of the carburetor body, above where the bowl was, there’s a small brass piece with a tiny hole in the tip. That’s the main jet. It’s usually removable with a flathead screwdriver – turn it counterclockwise.
Step 5: Clean All the Parts
Spray the carburetor body, jet, and bowl thoroughly with carburetor cleaner. Pay specific attention to every small hole and passage you can see.
Hold each jet hole up to light to confirm you can see through it clearly. If a jet is still blocked after spraying, use a single strand of wire from a wire brush or a thin piece of wire to gently clear it – never use a drill bit, which will enlarge the hole and change the fuel mixture.
Let everything soak in carburetor dip or soak in cleaner for 10 minutes if the buildup is heavy.
Step 6: Reassemble and Reinstall
Reassemble in reverse order. New gaskets are ideal if the old ones are brittle or cracked – a carburetor rebuild kit for common Briggs & Stratton or Tecumseh engines runs $5 to $15 at any hardware store or on Amazon.
Reinstall the carburetor, reconnect the throttle linkage using your photo as a guide, reattach the fuel line, refill with fresh fuel, and start the mower.
What to Do If Something Goes Wrong
| Problem | Likely Cause | Fix |
|---|---|---|
| Mower still stalls after cleaning | Jet still partially blocked | Remove jet again and soak longer; confirm light passes through the hole |
| Engine floods after reassembly | Float needle stuck open or missing | Inspect the float and needle valve inside the bowl; replace if bent or worn |
| Fuel leaking from carb after reinstall | Torn inlet gasket or loose bowl bolt | Replace the gasket; torque bowl bolt to finger-tight plus a quarter turn |
| Throttle linkage won’t move correctly | Spring or rod clipped in wrong position | Refer to your photo from Step 2; consult the engine manufacturer’s parts diagram online |
| Mower runs rough even with clean carb | Spark plug fouled or air filter dirty | Replace the spark plug and air filter before assuming the carb is still the problem |
Frequently Asked Questions
How long does cleaning a lawn mower carburetor take for a first-timer?
The spray-clean method takes 15 to 20 minutes including wait time. The full removal method takes 45 to 60 minutes the first time you do it. The reassembly is the part that slows most beginners down, so taking the reference photo of the linkage in Step 2 saves real time.
How often should I clean the carburetor?
Most homeowners don’t need to clean the carburetor more than once every two to three seasons, assuming they use fresh fuel and add a fuel stabilizer like STA-BIL before winter storage. If you leave fuel in the tank over winter without stabilizer, plan to clean the carburetor every spring.
Can I use WD-40 instead of carburetor cleaner?
No. Standard WD-40 is a lubricant and light solvent, but it won’t dissolve fuel varnish the way a dedicated carburetor cleaner does. Use WD-40 Specialist Carb & Throttle Body Cleaner if you’re buying from that brand – it’s a different product from the blue can and is formulated for this job.
What happens if I skip this and just keep running the mower?
A partially blocked carburetor makes the engine run lean – too much air, not enough fuel. Running lean causes the engine to overheat, which accelerates wear on piston rings and cylinder walls. Over time you’re looking at a much more expensive repair. A carburetor clean costs you an hour; ignoring it can cost you the engine.
Do I need to replace the carburetor, or is cleaning always enough?
Cleaning works in the majority of cases. Replacement makes sense when the carburetor body is physically cracked, the throttle bore is worn oval, or the float is punctured and won’t hold its position. Replacement carburetors for common Briggs & Stratton and Tecumseh engines run $15 to $40 on Amazon, so if cleaning doesn’t resolve the issue after two attempts, replacing is often easier and cheaper than continued troubleshooting.
Quick Recap
- Disconnect the spark plug wire before doing anything.
- For mild buildup: spray carb cleaner into the air intake throat, work the choke plate, let it sit five minutes, run the engine.
- For heavy varnish: drain the fuel, remove the carb, pull the bowl, clean the jet, reassemble with fresh gaskets if needed.
- Confirm the main jet hole is clear by holding it up to light – you should see straight through it.
- Refill with fresh fuel and run at full throttle for two to three minutes to confirm the fix held.