How to Sharpen Lawn Mower Blades Without Removing Them in 2025
TL;DR
- You can sharpen a lawn mower blade without removing it by using an angle grinder or a blade sharpener drill attachment while the blade stays on the deck.
- This method works best for light touch-ups between full seasonal sharpenings – not for badly nicked or bent blades.
- You’ll need to disconnect the spark plug wire before touching the blade – no exceptions.
- The full process takes 15-25 minutes for most homeowners with basic tools.
- If the blade is warped, cracked, or has chunks missing, remove it and replace it entirely.
What “Sharpening Without Removing” Actually Means

Credit: https://www.pinterest.com/
Sharpening a lawn mower blade without removing it means using a hand tool or power tool to restore the cutting edge while the blade stays bolted to the spindle under the deck. You tilt the mower onto its side (carburetor side up), lock the blade in place, and run a sharpener along the beveled edge – no socket wrench required.
This approach is faster than a full blade removal and works well as a mid-season tune-up when the blade has gone slightly dull but isn’t damaged. It’s the same basic motion as sharpening with the blade off – you’re just working from a different angle.
What You Need Before You Start
Tools:
- Angle grinder with a metal grinding disc, or a drill-mounted blade sharpener (the Oregon 30846 is a common option, available at most hardware stores for around $10-15)
- Work gloves rated for metal grinding
- Safety glasses
- A block of wood or blade brake tool to lock the blade from spinning
Safety steps:
- Disconnect the spark plug wire and tuck it away from the plug before doing anything else – this prevents accidental engine start.
- Empty the gas tank or run the engine dry before tilting the mower, OR tilt with the carburetor side up to prevent oil and fuel from flooding the air filter.
- Let the engine cool completely if you’ve mowed recently.
Step 1: Disconnect the Spark Plug Wire and Tilt the Mower
Pull the spark plug wire off the spark plug tip – it’s the rubber boot at the side of the engine. Give it a firm tug; it pops right off. Set it aside so it can’t accidentally reconnect.
Tilt the mower onto its side with the air filter and carburetor facing up. On most push mowers – Toro Recycler, Craftsman M105, Honda HRX217 – this means the left side goes down when you’re standing behind the handle. Check your owner’s manual if you’re unsure. Tilting the wrong way can push oil into the air filter.
Step 2: Lock the Blade So It Can’t Rotate
Wedge a block of scrap wood between the blade and the inside of the deck to stop the blade from spinning when you apply pressure. A 2×4 offcut works fine. Some homeowners use a blade brake tool for a cleaner hold, but the wood block method is reliable and costs nothing.
Do not skip this step. A blade that spins while you’re grinding against it will throw sparks unpredictably and can cause a serious hand injury.
Step 3: Inspect the Blade Before You Start Grinding
Before touching the blade with any tool, look at the cutting edge along its full length. You’re checking for three things: deep nicks or gouges, visible bends or warps, and cracks anywhere in the metal.
If you see cracks or a visible bend – even a slight one – stop here. A bent or cracked blade needs to be removed and replaced, not sharpened. Sharpening a warped blade makes it more dangerous, not less. Replacement blades for most residential mowers run $15-30 at a hardware store (estimate based on standard retail pricing, 2025).
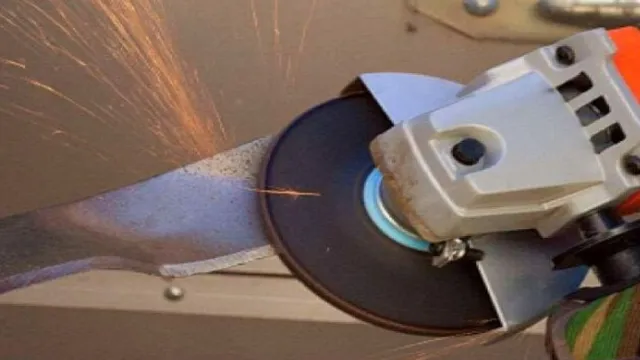
Step 4: Sharpen the Cutting Edge
Hold the angle grinder or drill attachment at the same angle as the existing bevel – typically 30 to 45 degrees on most residential blades. You’re following the factory edge, not creating a new one.
Run the grinder along the beveled face of the blade in smooth, even strokes from the center toward the tip. Apply light, consistent pressure. Three to five passes per side is usually enough for a dull but undamaged blade. You’re done when the edge has a visible shine and catches light evenly along its length.
Do not grind the flat underside of the blade. Only work the top beveled face.
Step 5: Check the Edge and Lower the Mower
Run a gloved finger very carefully along the sharpened edge – you should feel a consistent bite, not a smooth rounded surface. If one section still feels dull, give it two more passes with the grinder.
Once the edge feels right, remove the wood block, lower the mower back onto all four wheels, and reconnect the spark plug wire. Start the engine and let it run for 30 seconds before mowing to confirm everything is seated correctly.
When This Method Doesn’t Work
| Problem | What It Means | What to Do Instead |
|---|---|---|
| Deep nicks or chunks missing | Metal damage the grinder can’t fix evenly | Remove the blade and replace it |
| Visible bend or warp | Blade is out of balance – will shake the deck | Replace the blade |
| Cracks in the blade body | Structural failure risk | Replace immediately |
| Blade won’t stay locked | Spindle or blade bolt issue | Take to a small engine shop |
| Rust through the blade | Metal integrity is compromised | Replace the blade |
How Often Should You Sharpen a Lawn Mower Blade?
Credit: https://ourhometools.com/
Most homeowners should sharpen their blade once or twice per mowing season, with the most important sharpening happening before the first cut of spring. The University of Missouri Extension recommends sharpening after every 20-25 hours of use as a practical guideline, though mowing conditions vary.
Sandy soil, sticks, and gravel dull a blade faster than a clean suburban lawn. If the grass looks torn and ragged after mowing instead of cut clean, that’s the clearest sign the blade needs attention – dull blades tear grass like a butter knife instead of cutting it, which stresses the turf and leaves it more vulnerable to disease.
Frequently Asked Questions
Can you really sharpen a lawn mower blade without taking it off?
Yes. You can sharpen a lawn mower blade without removing it by tilting the mower onto its side with the carburetor facing up, locking the blade with a wood block, and running an angle grinder or drill-mounted sharpener along the cutting edge. This works for light sharpening but not for bent, cracked, or heavily damaged blades.
Do I need to balance the blade after sharpening without removing it?
Balancing is harder to verify without removing the blade. For a light touch-up sharpening where you remove only a small amount of material evenly from both ends, the balance impact is minimal. If you do a significant sharpening on one side, remove the blade and check balance on a blade balancer (about $5 at any hardware store) before reinstalling.
What angle should I sharpen a lawn mower blade at?
Most residential lawn mower blades use a 30 to 45 degree bevel angle. Follow the existing factory angle on your blade rather than guessing – you’re restoring the edge, not resetting it. Honda, Toro, and Husqvarna blades all fall within this range.
How do I know when a blade needs replacing instead of sharpening?
Replace the blade if you see any of the following: cracks anywhere in the metal, a visible bend or warp when you sight down the length of the blade, chunks of metal missing from the cutting edge, or heavy corrosion that has eaten through the blade body. A blade in any of these conditions is a safety risk regardless of how sharp the edge is.
Is it safe to tilt a lawn mower on its side?
Yes, with two conditions: disconnect the spark plug wire first, and tilt it with the air filter and carburetor facing up. Tilting the wrong way can allow engine oil to enter the air filter, which will cause the engine to smoke or run poorly on the next start. Drain the fuel tank first if you’re not sure which side is correct for your model.
Quick Recap
- Disconnect the spark plug wire before touching the blade.
- Tilt the mower with the carburetor facing up.
- Lock the blade with a wood block so it can’t spin.
- Inspect for cracks, bends, or missing chunks – stop and replace if you find any.
- Grind the beveled face at 30-45 degrees using smooth, even strokes.
- Reconnect the spark plug wire and test the engine before mowing.